.svg)


With the advent of the smart home era, IoT devices for temperature and humidity monitoring and related services are overflowing. However, from a developer's point of view, there are a few things that are disappointing. Most services collect data in 1-minute or 1-hour increments, and this data collection cycle may not be sufficient in situations where sophisticated monitoring is required.
We decided to work on this project to solve this problem. We are trying to manage the smart home environment more efficiently through more detailed data collection and real-time notifications. And let's implement this using our product Watab.
Part 1: Project OverviewIt's a good idea to read it first.
Part 2: Hardware configuration
In this article, I want to set up a basic data collection environment by setting up the Raspberry Pi hardware and connecting a temperature and humidity sensor.
Raspberry Pi settings
- The first step to using Raspberry Pi is to install an operating system. Raspberry Pi site (https://www.raspberrypi.com/software/) Download the Raspberry Pi Imager from Connect the SD memory for the Raspberry Pi to the PC's memory card reader.
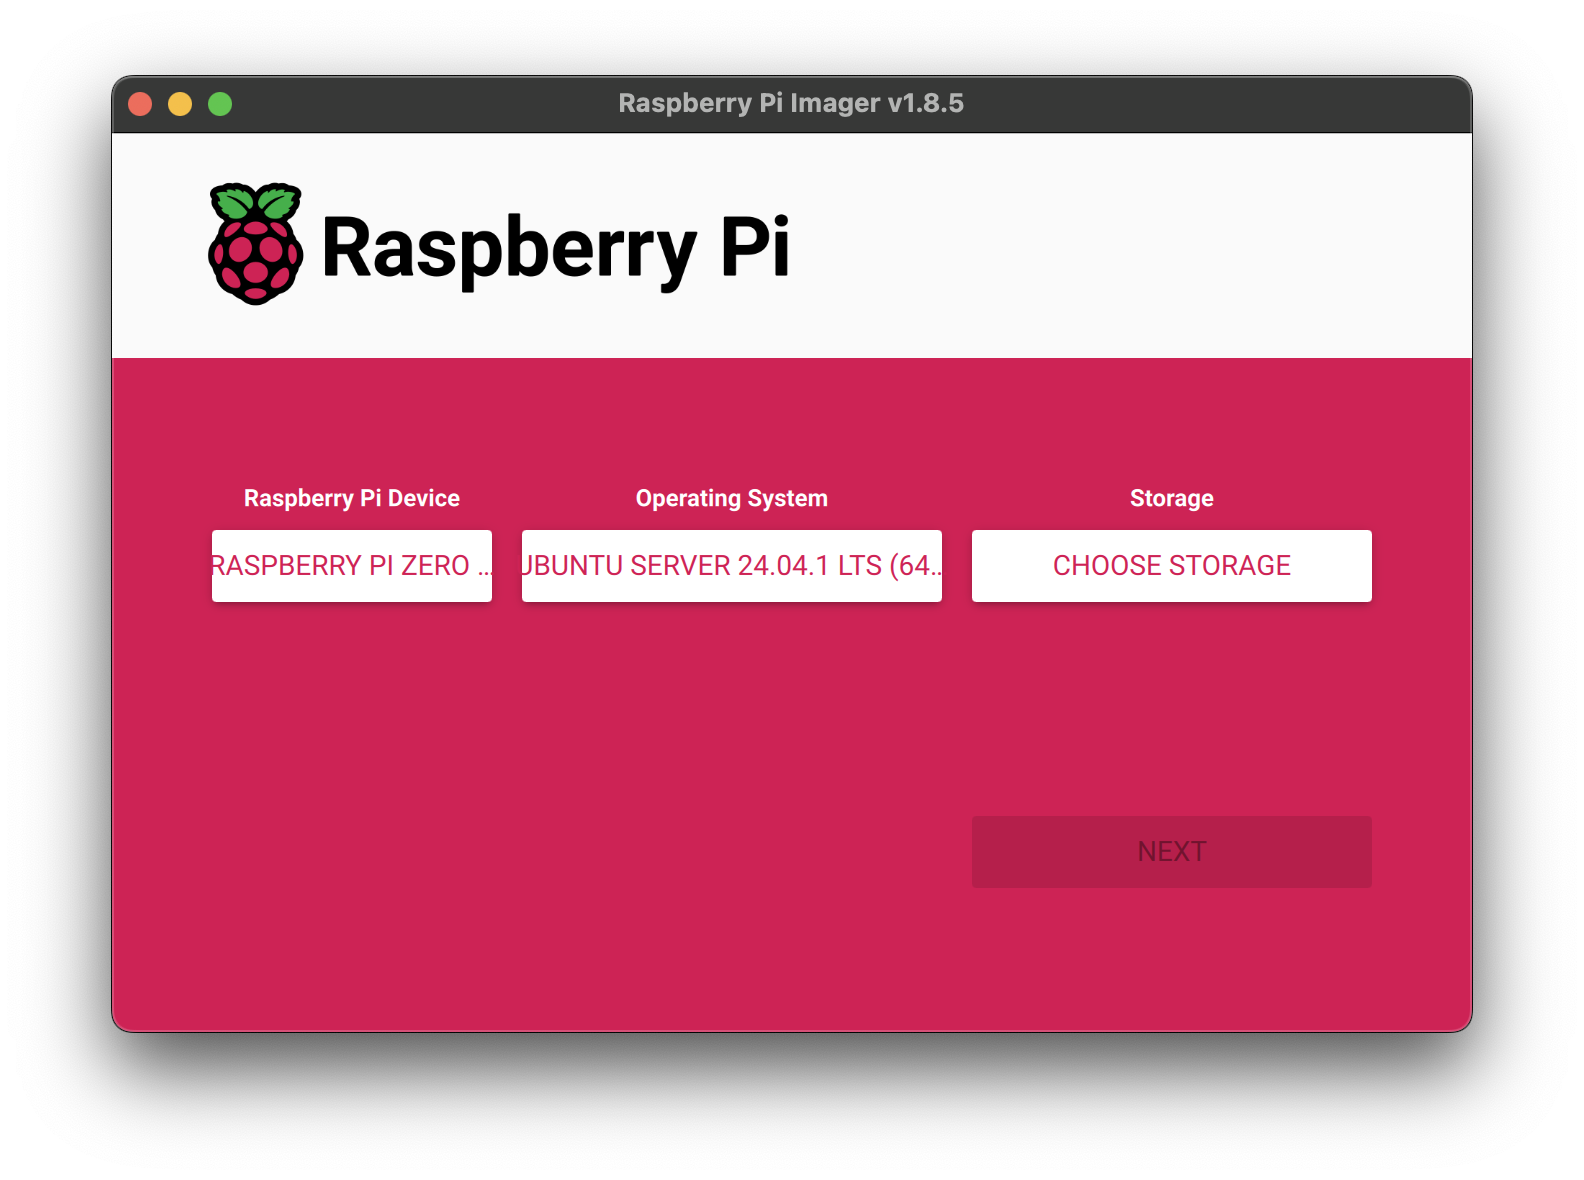
- Specify Device, OS, and Storage (SD memory). I used Raspberry pi zero 2w and Ubuntu Server 24.04.1 LTS, but it's OK to use a different configuration depending on the conditions.

- You can specify preset environment values when copying the OS to SD memory. If you specify WIFI settings and account information, there is no need to connect a monitor or keyboard to set up the Raspberry Pi.

- If you don't want to connect a monitor, you must enable the SSH service.
- After copying is complete, insert the SD memory into the memory slot of the Raspberry Pi and connect a power source (Micro USB).
- After a few minutes, find Raspberry Pi on the WIFI router's DHCP list.
If connecting to the router is difficult, Angry IP Scanner (https://angryip.org/You can also find out the Raspberry Pi's IP by searching for IPs with port 22 (SSH) enabled using a tool such as).
Even if you do the above, if the IP is unknown, you can directly view the Raspberry Pi console screen by connecting the HDMI port to a monitor and connecting a USB keyboard to check for wireless LAN connection errors, etc.
Temperature and humidity sensor connection
Raspberry Pi Pin Connection Guide
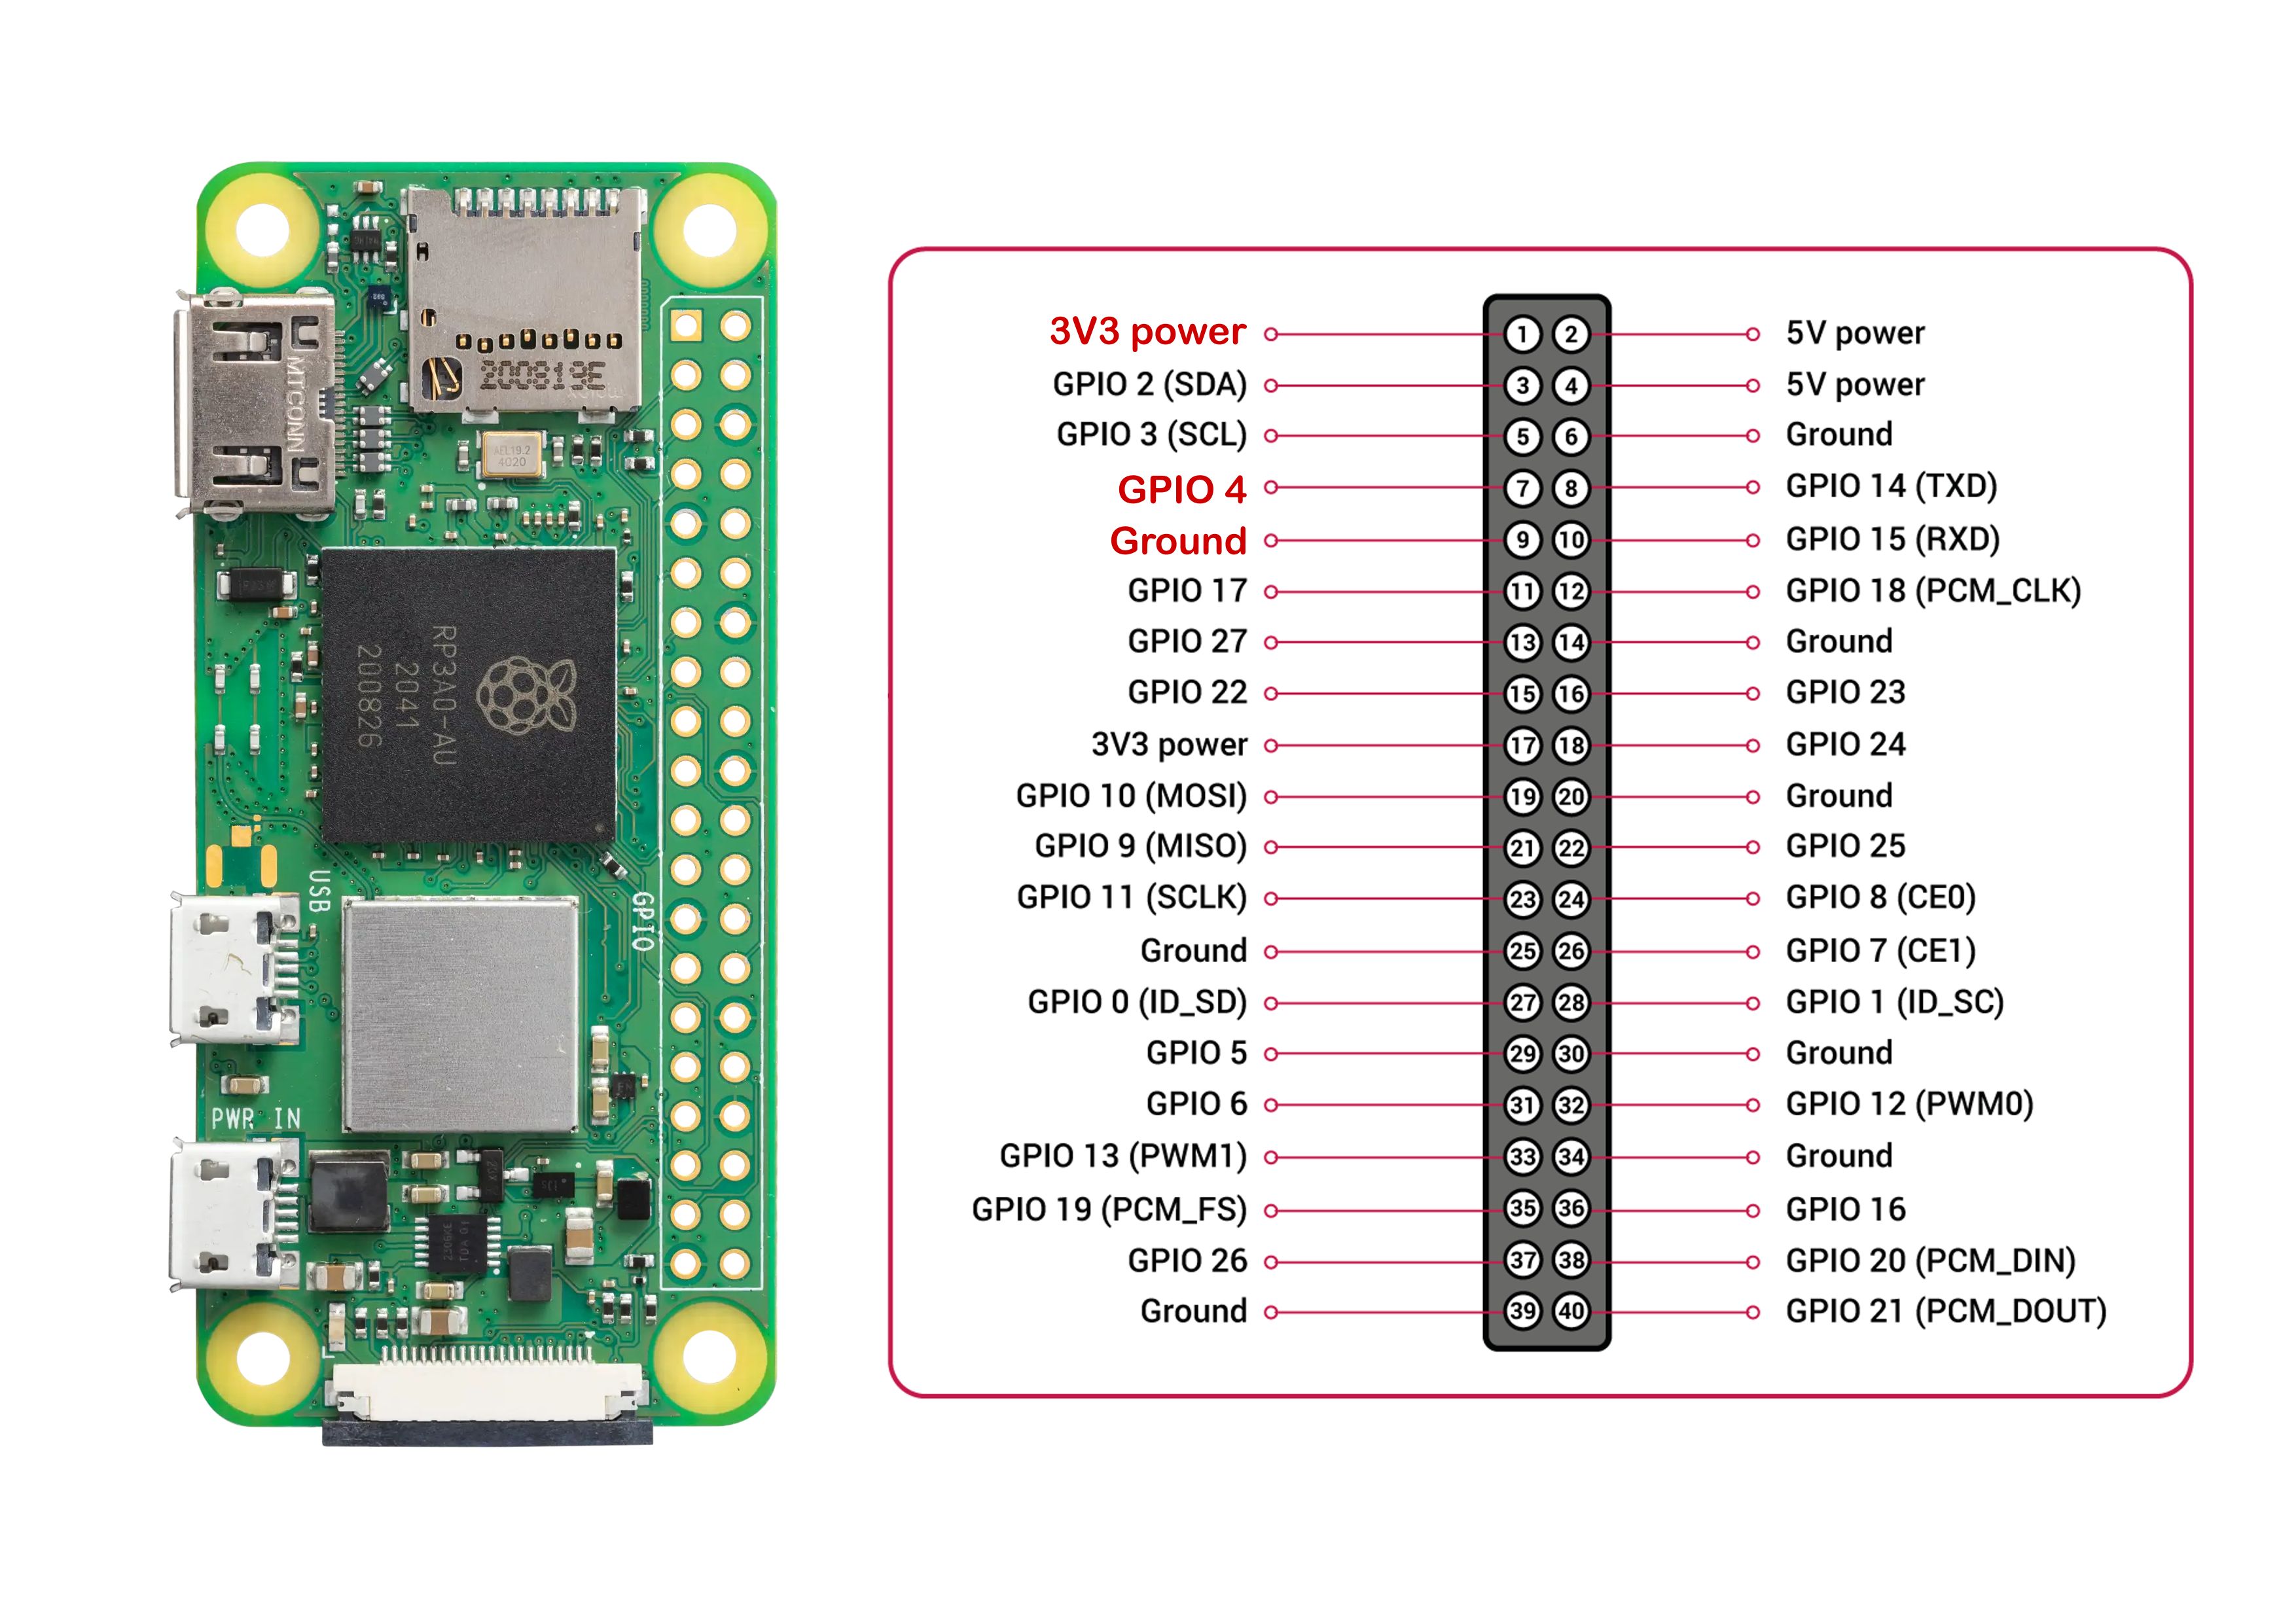
The Raspberry Pi has a header with 40 pins. Since the Zero series is not equipped with a pin header as standard, soldering the pin header is required.
Those who have trouble soldering can also use the basic series 2, 3, 4, and 5. The arrangement of pin headers in the Raspberry Pi product series is generally similar; for example, GPIO pin 4 is in the same position as the Zero series and other series.
- Pin 1 - DC 3.3v
- Pin 7 - GPIO4
- Pin 9 - Ground
Connect the top 3 pins to the sensor via a cable.
Temperature and humidity sensor pin connection guide
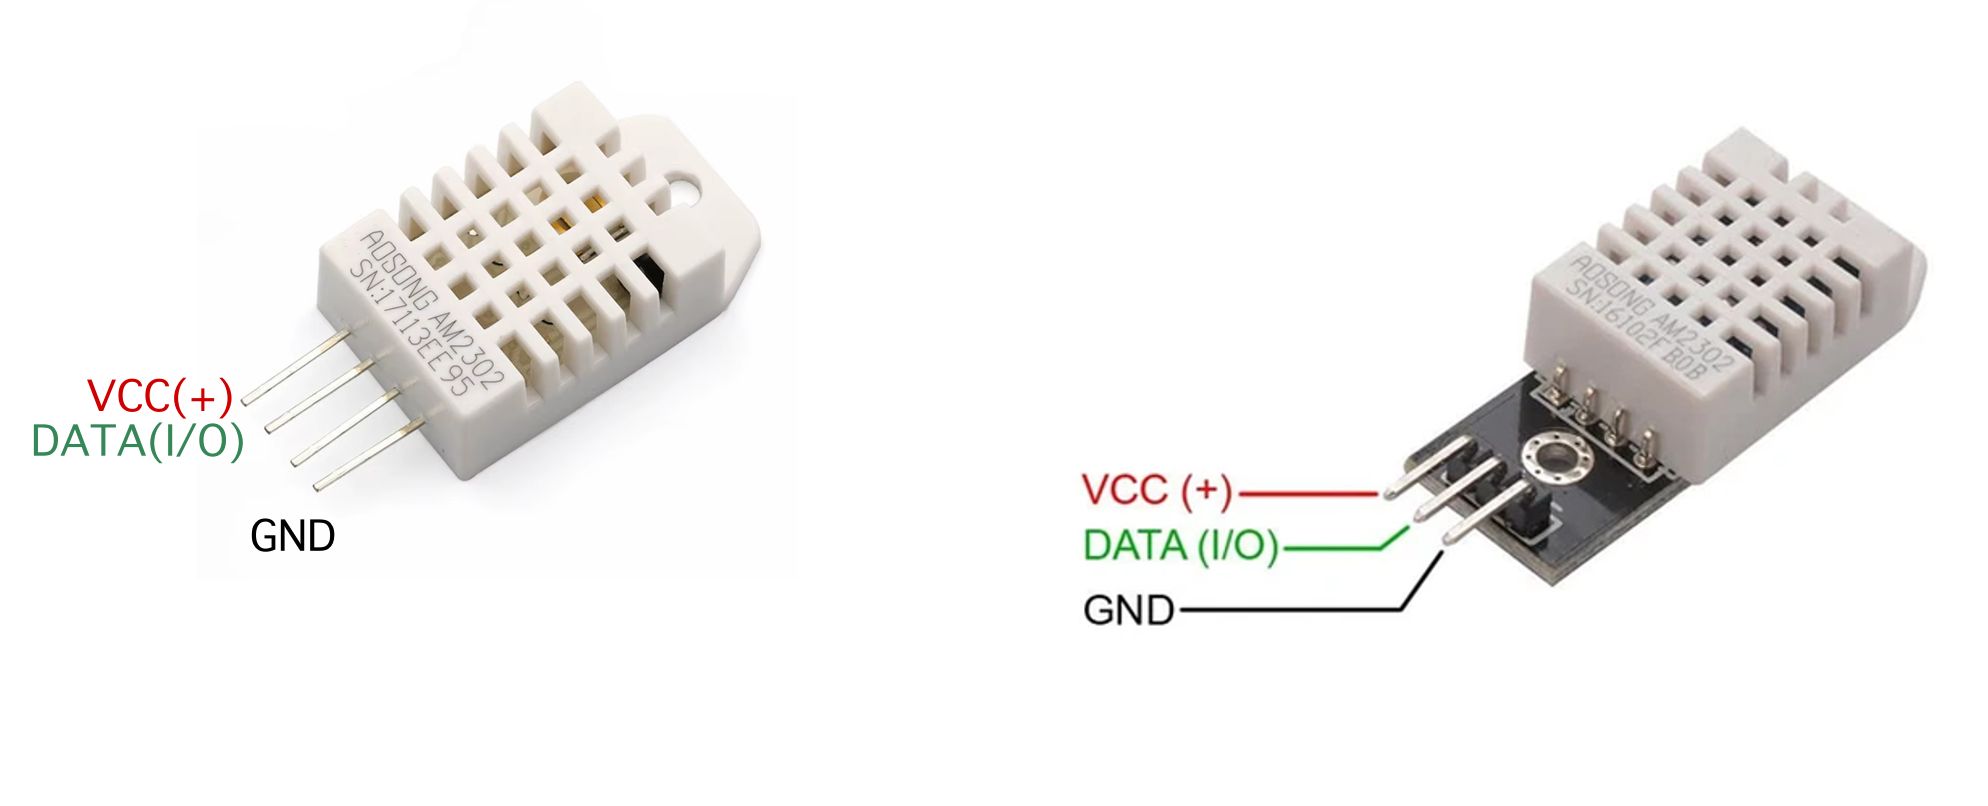
For the DHT22 sensor, the pin arrangement (from left) is shown below.
- Pin 1 - VCC (DC 3.3v to 5.0v)
- Pin 2 - DATA
- Pin 3 - Not Connected
- Pin 4 - GND
The case of a module soldered to a PCB is as follows.
- Pin 1 - VCC (DC 3.3v to 5.0v)
- Pin 2 - DATA
- Pin 3 - GND
The module soldered to the PCB has a pull-up resistor (pull-up resistor) connected to the board. The pull-up resistor keeps the input pin high (high voltage) by default to keep the logic data transmitted through the DATA line stable. Generally, resistance values of 4.7 kΩ to 10 kΩ are used. To reduce errors during communication with the temperature sensor, it is recommended to use a module with a pull-up resistor.
Connecting a sensor to a Raspberry Pi

Raspberry Pi pin sensor pin (module) Pin 1 - DC 3.3vPin 1 - vccPin 7 - GPIO4pin 2 - DataPin 9 - groundPin 3 - GND
Once the 3 wires are connected to each other as above, the hardware is all ready.
Precautions when connecting sensors
- Keep the cable length within 20 cm
- Be sure to use 3.3 V as the power source (to match the Raspberry Pi gpio 3.3 V level)
- Use of modules with pull-up resistors is recommended
Build a development environment
Python installation
Connect to Raspberry Pi with ssh and update the OS.
libgpiod installation
To use GPIO pins on Linux-based devices such as the Raspberry Pi, an additional installation is required.
Python virtual environment setup
Each project uses a virtual environment to manage different library versions and dependencies independently. This allows you to implement an isolated environment for each project without touching the global Python environment.
Building a data collection environment
Basic code
Let's write basic code to obtain data from the DHT22 sensor using python. adafruit_dht (https://docs.circuitpython.org/projects/dht/en/latest/) A library was used, and only a message was output when a sensor communication error occurred.
Improved final code
Write stable code that can be used in actual operation.
Write code to collect data from sensors and return results as json. It makes up to 5 attempts, and records the presence or absence of errors only in the json data without outputting an error message.
Final execution result
Troubleshooting guide
1. Raspberry Pi connection issues
- WIFI connection failure: recheck the WIFI information entered in the image settings
- Wireless LAN uses 2.4 Ghz band
- Use WPA/WPA2 security
- IP address search failed: use Angry IP Scanner or connect the monitor directly
2. Sensor-related issues
- When a sensor reading error occurs:
- Check cable connection status
- Check pull-up resistance (4.7 kΩ to 10 kΩ)
- Make sure the cable length is within 20 cm
- Unstable measurements:
- Make sure the sensor location is near direct sunlight or a source of heat
- Check for communication noise
finishing
In Part 3, we'll look at how to send collected temperature and humidity data to the Watap monitoring system. We'll cover the process of configuring the WhATap dashboard and notifications by setting up WhaTap Focus and implementing data transmission. We'll see you in the next episode!
Reference materials
Series composition
Part 1: Project Overview (link)
- Project introduction
- What hardware to use
- Software to use
Part 2: Hardware configuration (this article)
- Raspberry Pi (Zero 2 W) settings
- Connecting a temperature and humidity sensor (DHT22)
- Building a data collection environment
Part 3: Watap integration
- WhaTap Focus settings
- Implementing data transfer
- Configure the WhaTap dashboard and notifications
Part 4: Mobile app development
- WhaTap Open API integration
- Implementing a real-time monitoring app