.svg)
.svg)


Selenium provides tools that make it easy to create web application tests without using a programming language and run them automatically across multiple browsers. Among the many tools provided by Selenium, the Selenium IDE allows you to easily create tests, save them to a file and send them to the Selenium Grid, which allows you to remotely run automated tests against different browsers and receive the results.
Let's take a quick look at how to install it, how to use it, and how to configure the Grid.
Selenium IDE
The Selenium IDE is a tool that makes it easy to create web browser tests. Let's start by installing it, using it, and creating a test using the record and playback features.
Installing the Selenium IDE and Record and Playback
The Selenium IDE is available as an extension for Chrome and Firefox. You can download Firefox from Add-ons and Chrome from Chrome Web Store.
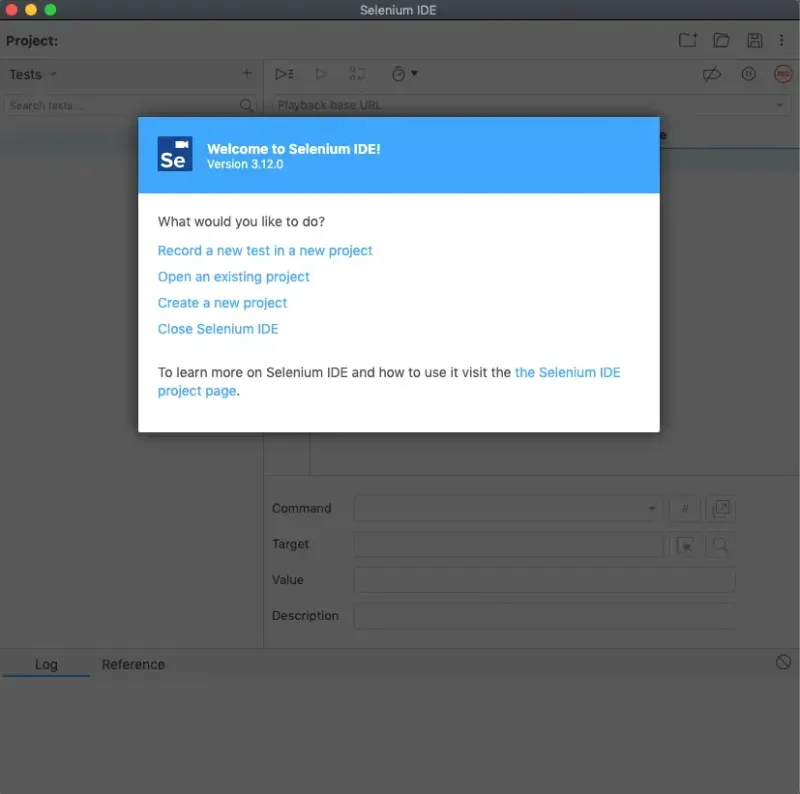
When you launch the IDE, select "Create a new project" on the first screen, enter a name for your project, and create it.
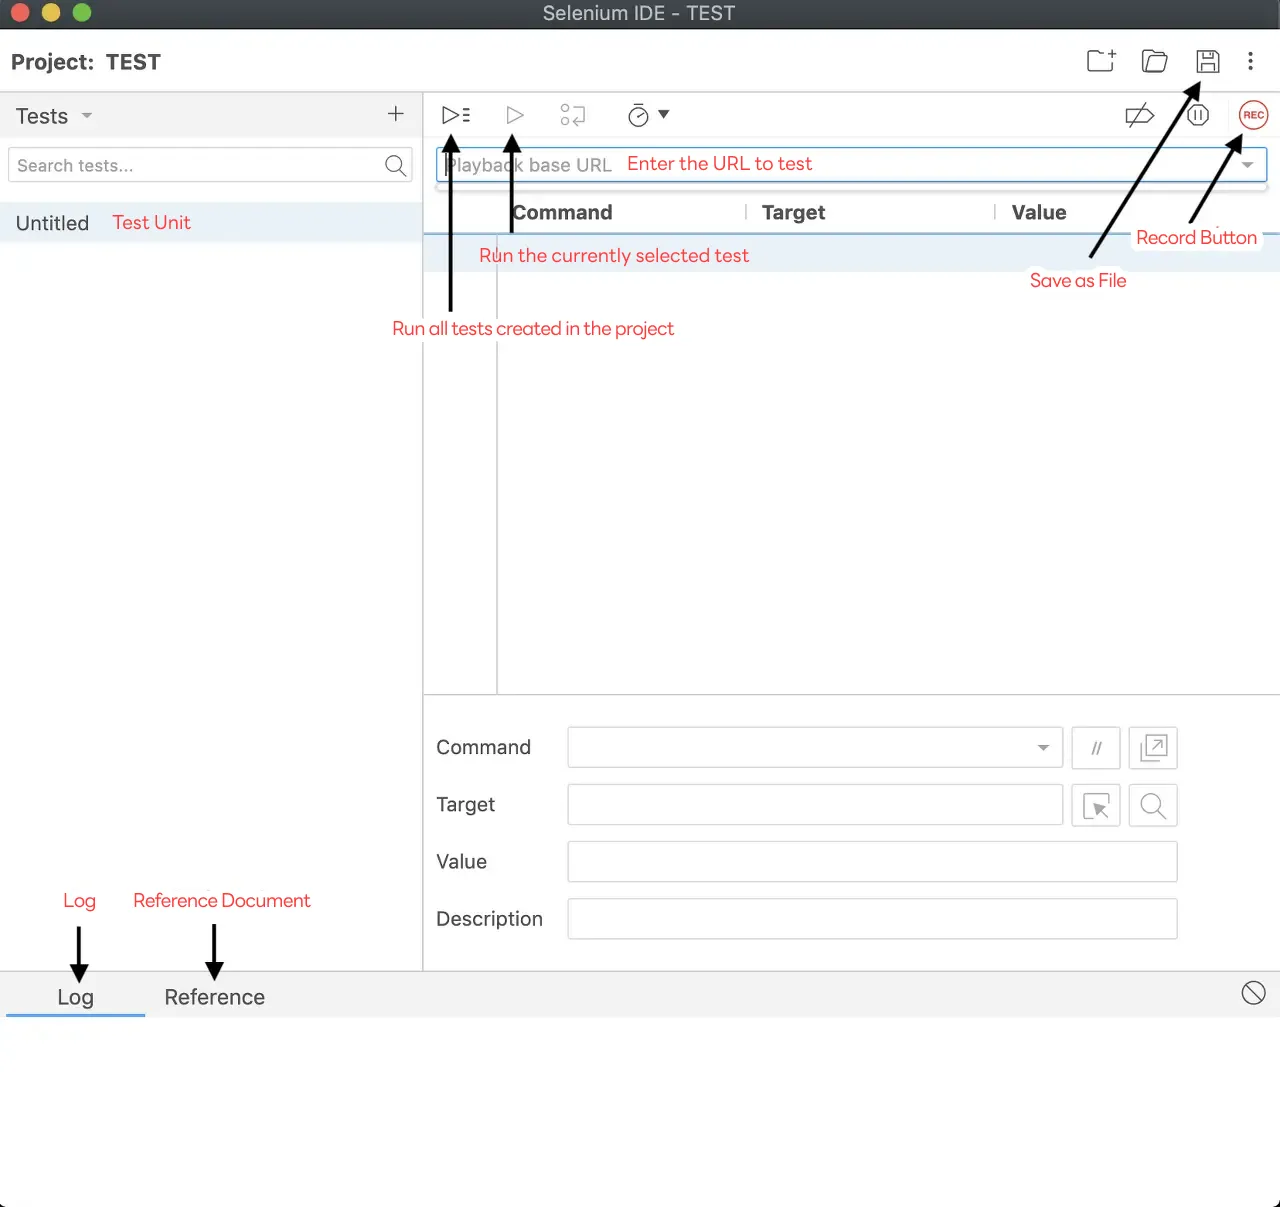
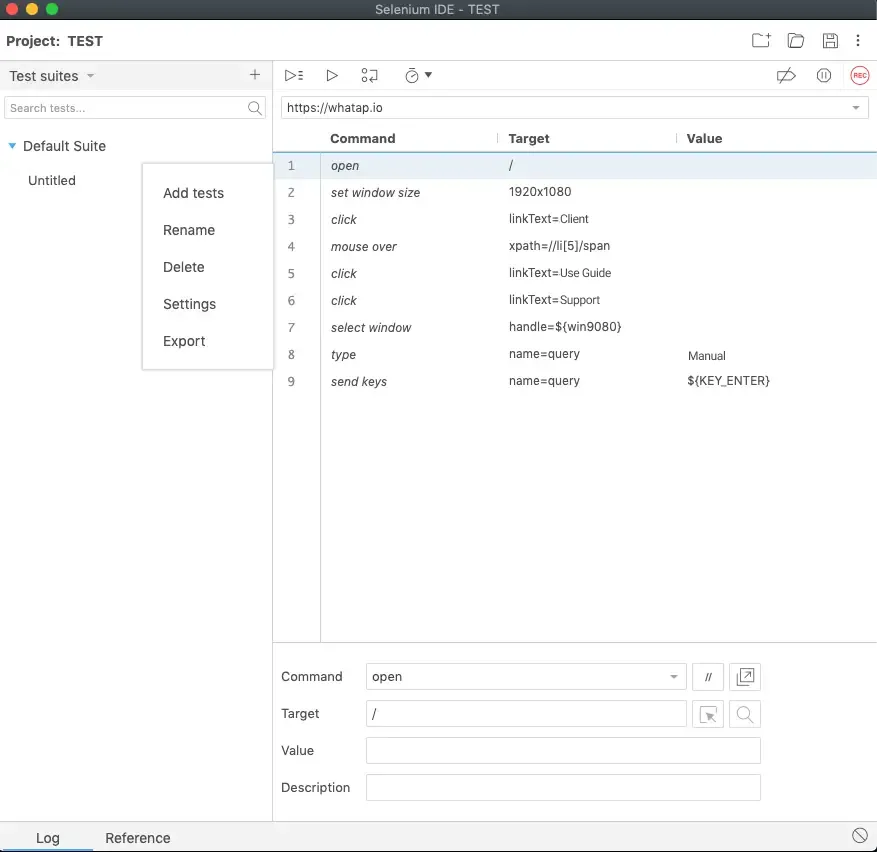
Configuring the Selenium IDE screen
Enter a URL and press the Record button to open the URL in a new window and start recording all the actions you take on that page. When you are done recording, click the Stop Recording button. Now press the Play button to replay the exact same test you recorded.
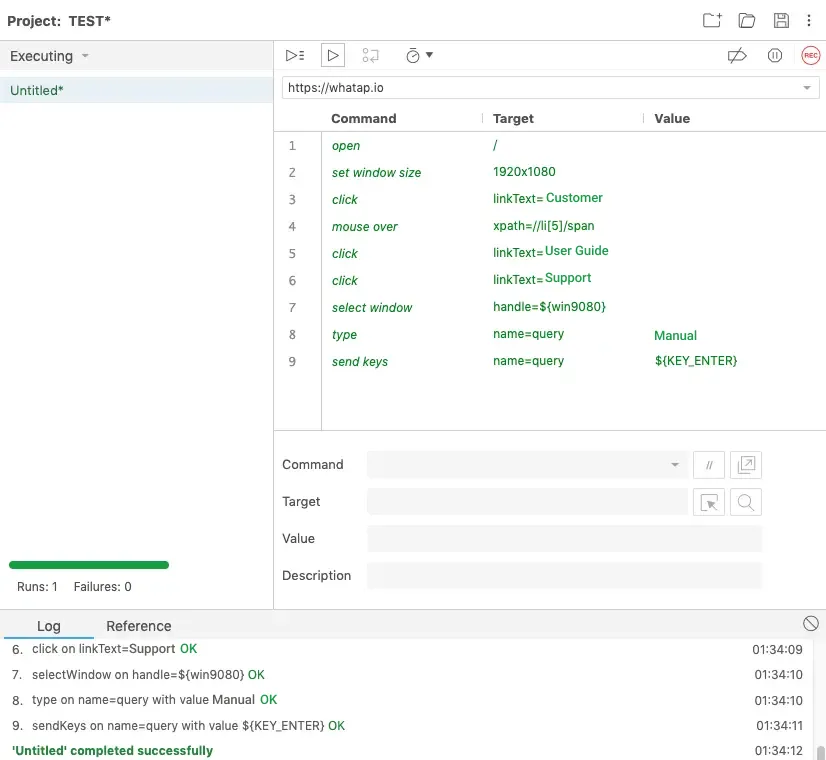
The recorded commands show the window size, the information of the HTML tag clicked with the mouse, and all the actions typed in the input tag with the keyboard. When you press the Play button, the commands are executed sequentially. If the entire command succeeds, the log will leave a success log like the one above. You can find more command information in the Selenium Reference documentation or on the Reference tab at the bottom.
In this way, you can create multiple tests in one project or create multiple projects to run the tests multiple times. Now, when we are done recording everything, let's see how to save it to a file and send that file to Selenium Grid to test it on different browsers.
Selenium Grid
Configuring Selenium Grid
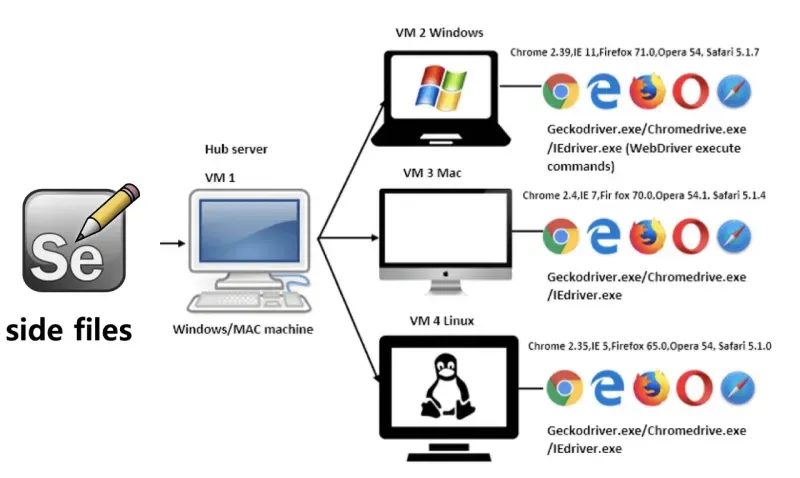
Selenium Grid consists of a Hub and Nodes. You send files created with the Selenium IDE to the Hub, and the Hub sends tests to the Node to run. The Node must have the browser you want to test and the browser driver for that browser installed. The Hub then manages information about the browsers installed on the Node and sends the file to the appropriate Node when it receives it.
To send tests to Hub, you first need to install selenium-side-runner from npm (if you do not already have npm installed, you will need to install it).

And the server that will act as the node must have the driver for the browser you want to test installed.

And we need to run the hub and node. Download Selenium stand alone jar file from Selenium homepage and execute it in java as below on the server that will act as Hub and server that will act as Node.
Hub server

Node Server


working selenium node on windows server
Now you can start testing the browser remotely by sending the file created with the Selenium IDE to Hub using the selenium-side-runner command we installed above. You can also specify which browser to run it in with the -c option.

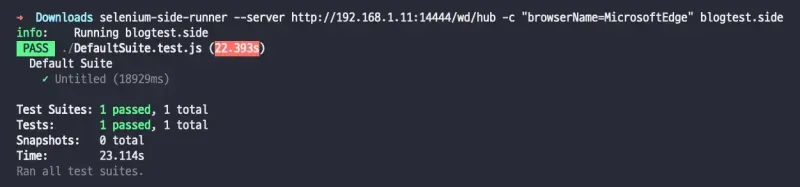
The results of actually running the test we created above show that it completed successfully in the browser we specified. In this way, browser testing can be done automatically.
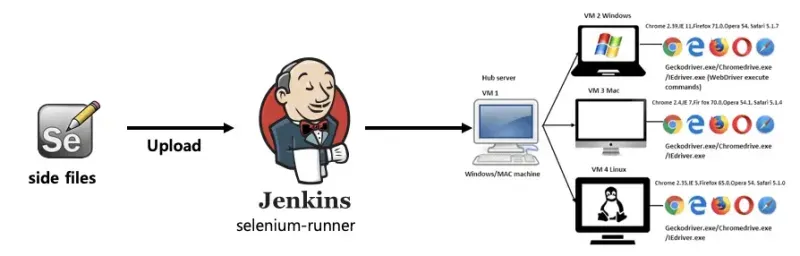
WhaTap's front deployment happens once a week, so I created a set of selenium tests to check for White Page bugs in front every time the deployment completes successfully, and configured it as a Jenkins Job... Since the front deployment is done through a Jenkins Job, we can also configure the Selenium test job to run as an automatic follow-up trigger.
Selenium IDE tips
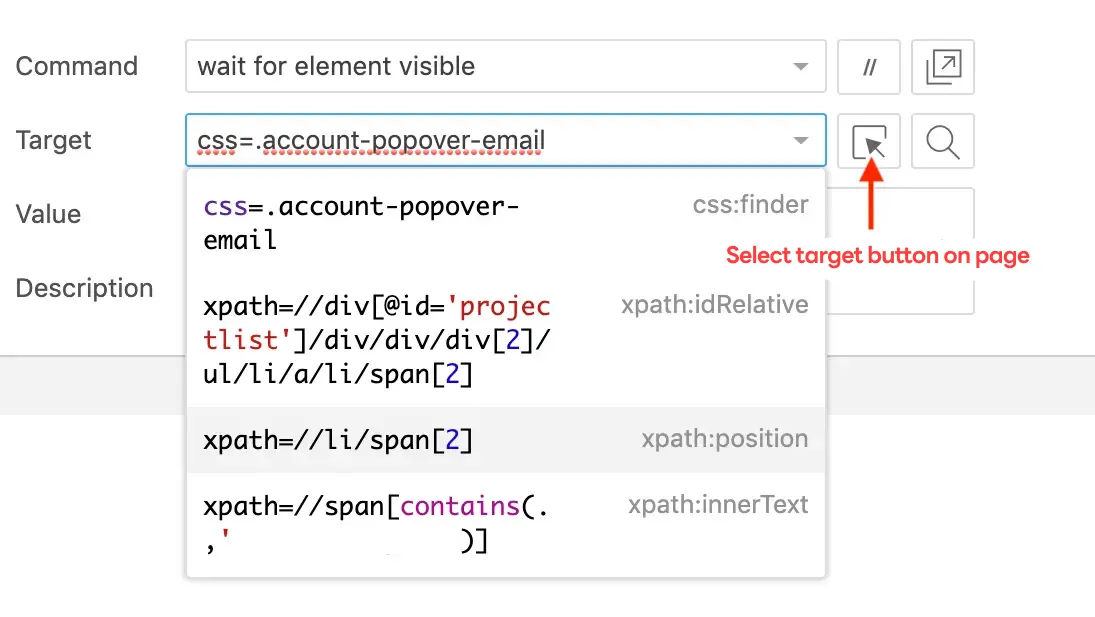
Specifying Targets
The Select Target on Page feature allows you to specify the element that you clicked with the mouse on a webpage as the target. Sometimes, when you specify a target, you may not be able to find it in the actual test. In that case, you can click Target in Command in the Selenium IDE, and we will show you how to find the target using xpath.
wait for element
If you look at the commands documentation, you will see that there are commands that start with wait for element. Because browser load times or the order of requests can vary from time to time, depending on your network environment or server performance, the order in which elements on your page complete loading can vary. That is why, whenever you run a test, you can tell the browser to specify a particular element and wait for it to reach the desired state within a specified amount of time. If it does not appear within that time, it fails.
(You can also pause the test for a specified amount of time with the command pause, but we recommend using the wait for element).

Wait for an element with the corresponding css class to be represented. Timeout of 5 seconds. Failure if exceeded
Store and flow control
You can use the store command to store the value of a specific element's text, value, or tiltle in the Selenium IDE. You can use this stored value to create an action that compares it to the value of a specific target using the if command.
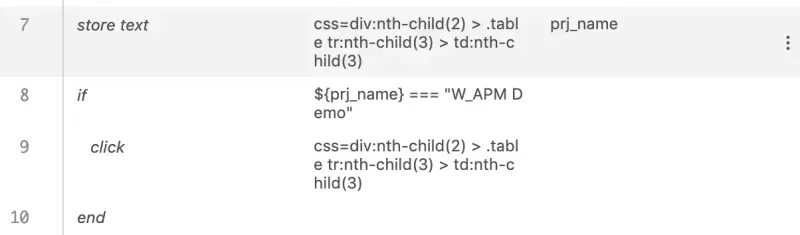
As shown in the image above, we store the text of the element named prj_name and targeted as target and compare it with the if command. If the condition is satisfied, we want the mouse click to be executed, otherwise we pass after END. IF should always be paired with the END command, otherwise you can use IF, REPEAT IF to set up multiple comparisons.
Verify and assert
In addition to controlling the flow by storing values and comparing them with if statements as above, commands that begin with verfiy allow you to determine whether a test succeeds or fails by verifying that the value of a specified element or test matches what you want.

Commands that start with assert work in a similar way to verify, except that if the condition in assert fails, subsequent commands are not executed. As a result, if verify and assert fail, both are logged as failures, but assert ignores all subsequent commands and ends execution. Verify, on the other hand, executes subsequent commands. You just need to figure out if what you need to verify is critical or not to affect subsequent execution and use it accordingly.
execute script
There are times when you need to use javascript to get data. For example, if you want your date picker to calculate the date a week ago based on the current date at runtime, you'll need to use a Date object, which is where the execute script command comes in. Create logic that uses a javascript Date object to get the date at the time of execution, format the date, calculate the date a week ago based on it, return it, and store the resulting data using the Date object in a name you specify, such as store.

In the image above, Target contains a short javascript code and Value is where you write the name of the data you want to store the results returned by Target. You can then recall it by name in other commands.
Run in parallel
The Selenium IDE has a Test suites unit that allows you to collect multiple tests. When you create a Suite, you can put the tests you want in it. When you group tests into a Suite, the tests run sequentially, but you can give them the option to run in parallel. Go to Test suites and hover over the Suite you created to see the Options button, click Settings, and you will see the Run in parallel option checkbox. If you check this option, you can run the tests in parallel. Running in parallel allows you to run tests in parallel and get run results faster. When running in parallel, each test must be independent.
Reference
https://github.com/SeleniumHQ/selenium/wiki/Grid2
https://www.seleniumhq.org/selenium-ide/docs/en/introduction/getting-started/


